Difference between revisions of "Lobule VI"
Jump to navigation
Jump to search
(New page: <meta name="title" content="Lobule VI"/> {{cer nav}} {{h2|Lobule VI}} *Location: Spans almost entire cerebellum, except the far lateral sides *Description: One boundary is easily identifi...) |
|||
| (6 intermediate revisions by 3 users not shown) | |||
| Line 1: | Line 1: | ||
| − | <meta name="title" content="Lobule VI"/> | + | <!-- <meta name="title" content="Lobule VI"/> --> |
| − | {{cer nav}} | + | {{cer nav|lobule=true}} |
{{h2|Lobule VI}} | {{h2|Lobule VI}} | ||
| Line 6: | Line 6: | ||
*Description: One boundary is easily identifiable in the midsagittal region as there is a clear, wide fissure separating lobules V and VI (see Figure 47) (this should already be defined) | *Description: One boundary is easily identifiable in the midsagittal region as there is a clear, wide fissure separating lobules V and VI (see Figure 47) (this should already be defined) | ||
*On the other side it is bounded by VIIAf and VIIAt. The best way to see this boundary is the begin at the mid-line of the sagittal view and travel laterally about 15mm. You should see lobule VIIAf, which is not usually present in the midline grow in prominence. This is the second boundary for lobule VI and can be followed laterally in the sagittal view. When delineating the mid line maintain the already established anatomical boundary. | *On the other side it is bounded by VIIAf and VIIAt. The best way to see this boundary is the begin at the mid-line of the sagittal view and travel laterally about 15mm. You should see lobule VIIAf, which is not usually present in the midline grow in prominence. This is the second boundary for lobule VI and can be followed laterally in the sagittal view. When delineating the mid line maintain the already established anatomical boundary. | ||
| + | *This is one of the most distinct and reliable boundaries in the Cerebellum. | ||
<gallery widths="500" heights="300"> | <gallery widths="500" heights="300"> | ||
| Line 11: | Line 12: | ||
image:lobuleVI_all.jpg | image:lobuleVI_all.jpg | ||
</gallery> | </gallery> | ||
| + | |||
| + | <gallery widths="500" heights="300"> | ||
| + | image:AnonKwijibo47_border_cr1_6.jpg|''Figure 1'' : This is the border between cr1 and lobule 6. It is perhaps the clearest and most easily spotted border | ||
| + | image:AnonKwijibo49_difficult_cr1_6.jpg|''Figure 2'' : The boundary between cr1 and 6 on the right (with the arrow) is particularily difficult in this brain because the scan is rather unclear and this is an ataxia subject. | ||
| + | </gallery> | ||
| Line 17: | Line 23: | ||
{{DEFAULTSORT:{{PAGENAME}}}} | {{DEFAULTSORT:{{PAGENAME}}}} | ||
[[Category:IACL]] | [[Category:IACL]] | ||
| + | [[Category:IACL Cerebellum Pages]] | ||
Latest revision as of 00:57, 3 July 2022
Lobule VI
- Location: Spans almost entire cerebellum, except the far lateral sides
- Description: One boundary is easily identifiable in the midsagittal region as there is a clear, wide fissure separating lobules V and VI (see Figure 47) (this should already be defined)
- On the other side it is bounded by VIIAf and VIIAt. The best way to see this boundary is the begin at the mid-line of the sagittal view and travel laterally about 15mm. You should see lobule VIIAf, which is not usually present in the midline grow in prominence. This is the second boundary for lobule VI and can be followed laterally in the sagittal view. When delineating the mid line maintain the already established anatomical boundary.
- This is one of the most distinct and reliable boundaries in the Cerebellum.


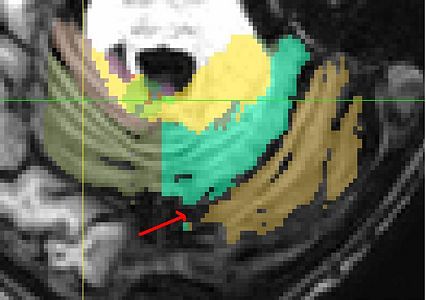
Figure 1 : This is the border between cr1 and lobule 6. It is perhaps the clearest and most easily spotted border
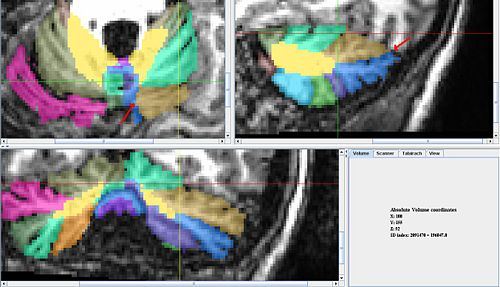
Figure 2 : The boundary between cr1 and 6 on the right (with the arrow) is particularily difficult in this brain because the scan is rather unclear and this is an ataxia subject.


