Difference between revisions of "Lobe Definitions"
m (IACL:CerProtocol2 moved to IACL:Lobe Definitions: More appropriate name.) |
(Headings and added 'cer nav'.) |
||
| Line 1: | Line 1: | ||
<meta name="title" content="Lobe Definitions"/> | <meta name="title" content="Lobe Definitions"/> | ||
| + | {{cer nav}} | ||
| + | __NOTOC__ | ||
{{h2|Lobe Definitions}} | {{h2|Lobe Definitions}} | ||
| + | {{TOCright}} | ||
| − | + | {{h2|Outline}} | |
| − | |||
| − | |||
| − | |||
| − | |||
* Begin with an MRI image and completed Phase 1 (Whole Cerebellum) mask. | * Begin with an MRI image and completed Phase 1 (Whole Cerebellum) mask. | ||
* Lock the background by changing its value to an unused paint value. | * Lock the background by changing its value to an unused paint value. | ||
| Line 13: | Line 12: | ||
* Common obstacles and solutions | * Common obstacles and solutions | ||
| − | + | {{h2|Locking the Background}} | |
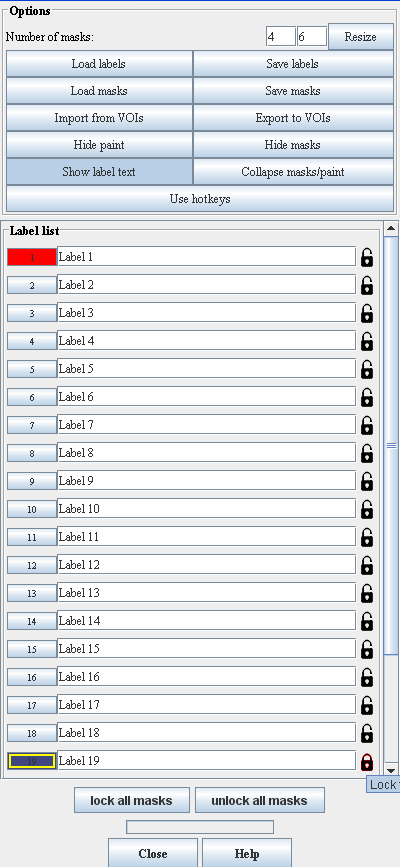
With the phase 1 mask loaded, the first thing that must be done is to lock the background layer. This layer includes anything that is NOT cerebellum and will serve as a guideline to minimize errors. First, go to Utilities -> Replace Pixel/Voxel Value. You will presented with a window similar to the figure below. In the box labeled "User defined value(s) and/or range(s)", type the number 0. Underneath the label "Replace with", type in a number that corresponds to a mask layer you will not use in the future. I recommend 19 simply because I think it has the best contrast with the other colors. Finally, select the option "Replace image" and click OK. The paint will need to be refreshed to be displayed properly. | With the phase 1 mask loaded, the first thing that must be done is to lock the background layer. This layer includes anything that is NOT cerebellum and will serve as a guideline to minimize errors. First, go to Utilities -> Replace Pixel/Voxel Value. You will presented with a window similar to the figure below. In the box labeled "User defined value(s) and/or range(s)", type the number 0. Underneath the label "Replace with", type in a number that corresponds to a mask layer you will not use in the future. I recommend 19 simply because I think it has the best contrast with the other colors. Finally, select the option "Replace image" and click OK. The paint will need to be refreshed to be displayed properly. | ||
| Line 27: | Line 26: | ||
When the Corpus Medullare and Lobes have been labeled, change the background back to the "zero" label | When the Corpus Medullare and Lobes have been labeled, change the background back to the "zero" label | ||
| − | + | {{h2|Painting the Corpus Medullare}} | |
For the delineation of the CM, sagittal view is recommended. Select layer 2 and pick a small to medium paintbrush (3x3 and 4x4 recommended) to begin painting in the corpus. If necessary, adjust the Active Image and Alpha Blending to increase the transparency of the other colors. To define the edges of the corpus, simply take lowest point between the valleys of the gray matter and visualize an imaginary line between them. This process is clarified in following figure (The red dots show where the valleys are): | For the delineation of the CM, sagittal view is recommended. Select layer 2 and pick a small to medium paintbrush (3x3 and 4x4 recommended) to begin painting in the corpus. If necessary, adjust the Active Image and Alpha Blending to increase the transparency of the other colors. To define the edges of the corpus, simply take lowest point between the valleys of the gray matter and visualize an imaginary line between them. This process is clarified in following figure (The red dots show where the valleys are): | ||
| Line 34: | Line 33: | ||
IMPORTANT: Always keep in mind that a smooth and logical boundary is more important than an "accurate" boundary. Always double check with axial and coronal views to make sure the boundary is as smooth as possible | IMPORTANT: Always keep in mind that a smooth and logical boundary is more important than an "accurate" boundary. Always double check with axial and coronal views to make sure the boundary is as smooth as possible | ||
| − | + | {{h2|Locating Fissures}} | |
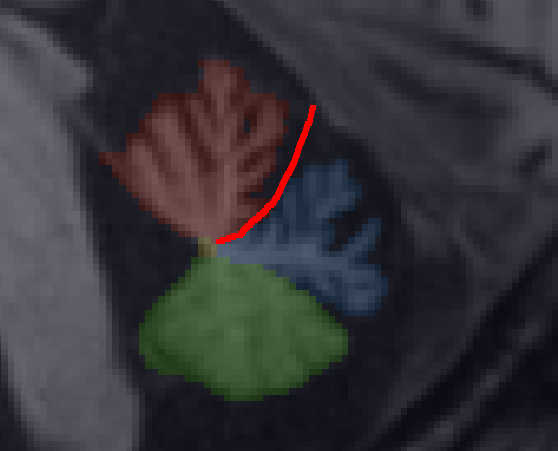
The primary fissure (indicated by the red line) separates Lobules V and VI as shown below: | The primary fissure (indicated by the red line) separates Lobules V and VI as shown below: | ||
| Line 45: | Line 44: | ||
[[Image:prepyramidal.PNG|Prebiventer/Prepyramidal Fissure]] | [[Image:prepyramidal.PNG|Prebiventer/Prepyramidal Fissure]] | ||
| − | + | {{h2|Following Fissures}} | |
The easiest way to follow a fissure is to start at the midline slides and progress to the outer edges of the cerebellum. Once a fissure is located, the fastest way to outline the fissure is to paint lobules VI and VII (Posterior Lobe). This means that both the fissures will be defined at the border of the posterior lobe. After that is done, the posterior lobe can simply be locked, thereby making painting I-V and VIII-X trival. | The easiest way to follow a fissure is to start at the midline slides and progress to the outer edges of the cerebellum. Once a fissure is located, the fastest way to outline the fissure is to paint lobules VI and VII (Posterior Lobe). This means that both the fissures will be defined at the border of the posterior lobe. After that is done, the posterior lobe can simply be locked, thereby making painting I-V and VIII-X trival. | ||
| − | + | {{h2|Common Obstacles and Their Solutions}} | |
There are a lot of obstacles. | There are a lot of obstacles. | ||
[[Category:IACL Cerebellum Pages|Lobe Definitions]] | [[Category:IACL Cerebellum Pages|Lobe Definitions]] | ||
Revision as of 01:21, 19 September 2008
<meta name="title" content="Lobe Definitions"/>
| Cerebellum Protocol Project | |||
|---|---|---|---|
| Whole Cerebellum | Lobe Definitions | Vermis Definition | Lobule Delineation |
Lobe Definitions
Outline
- Begin with an MRI image and completed Phase 1 (Whole Cerebellum) mask.
- Lock the background by changing its value to an unused paint value.
- Paint the corpus, and then lock it.
- Delineate Lobules I-V, VI-VII, and VIII-X by locating and following fissures (Primary and Prebiventer).
- Common obstacles and solutions
Locking the Background
With the phase 1 mask loaded, the first thing that must be done is to lock the background layer. This layer includes anything that is NOT cerebellum and will serve as a guideline to minimize errors. First, go to Utilities -> Replace Pixel/Voxel Value. You will presented with a window similar to the figure below. In the box labeled "User defined value(s) and/or range(s)", type the number 0. Underneath the label "Replace with", type in a number that corresponds to a mask layer you will not use in the future. I recommend 19 simply because I think it has the best contrast with the other colors. Finally, select the option "Replace image" and click OK. The paint will need to be refreshed to be displayed properly.
Next, proceed to the advanced paint tools window that you loaded the phase 1 mask with. Click the button that says "Show label text". Find the number that you replaced the background with and click the lock symbol next to it. The final result should look like this:
It may be useful to reduce the opacity of the background paint by adjusting the "Active Image and Alpha Blending" bar to roughly .75A.
When the Corpus Medullare and Lobes have been labeled, change the background back to the "zero" label
Painting the Corpus Medullare
For the delineation of the CM, sagittal view is recommended. Select layer 2 and pick a small to medium paintbrush (3x3 and 4x4 recommended) to begin painting in the corpus. If necessary, adjust the Active Image and Alpha Blending to increase the transparency of the other colors. To define the edges of the corpus, simply take lowest point between the valleys of the gray matter and visualize an imaginary line between them. This process is clarified in following figure (The red dots show where the valleys are):
IMPORTANT: Always keep in mind that a smooth and logical boundary is more important than an "accurate" boundary. Always double check with axial and coronal views to make sure the boundary is as smooth as possible
Locating Fissures
The primary fissure (indicated by the red line) separates Lobules V and VI as shown below:
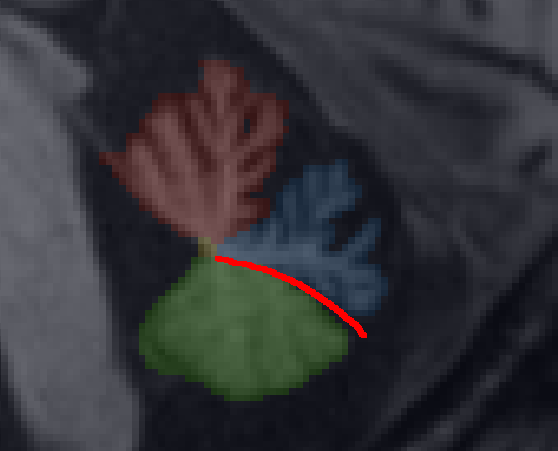
The prebiventer fissure separates Lobules VII and VIII as shown below:
Following Fissures
The easiest way to follow a fissure is to start at the midline slides and progress to the outer edges of the cerebellum. Once a fissure is located, the fastest way to outline the fissure is to paint lobules VI and VII (Posterior Lobe). This means that both the fissures will be defined at the border of the posterior lobe. After that is done, the posterior lobe can simply be locked, thereby making painting I-V and VIII-X trival.
Common Obstacles and Their Solutions
There are a lot of obstacles.


